


Common Methods of Blood Collection in the Mouse
 source:ELK Biotechnology
 date:2023-08-09
 views:460
The mouse is commonly used as experimental animals in scientific research, but due to their small size and thin blood vessels, blood collection is difficult, which in turn affects the quality of blood collection.
ELK Biotechnology briefly summarizes the common methods of blood collection from mouse for reference only.
The circulating blood volume of an adult mouse is about 1.5-2.5 ml, which is about 6-8% of body weight. When collecting blood from a mouse in good nutritional condition, a single collection can reach up to 10% of the circulating blood volume, (example: if a 20g mouse, its total blood volume accounts for about 1.2-1.4 ml, i.e. taking 120 ul-140 ul of blood each time will not affect the mouse too much). Blood collection should be followed by warm isotonic solution supplementation, which can restore the original level within 2 to 3 weeks. The amount of blood collected for two weeks is less than 10% of blood circulation, less than 7.5% for a single week, and 72 ml/kg of blood circulation in mouse.
Commonly used anticoagulants in the laboratory: EDTA salt, citrate, oxalate, heparin.
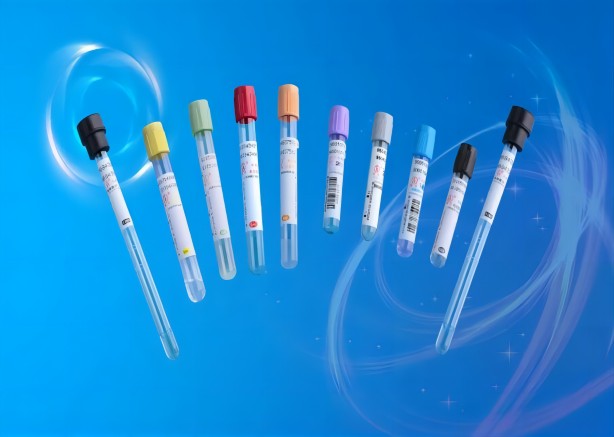
Commonly used blood collection tubes in the laboratory: (inverted and mixed 8 times immediately after blood collection)
1. Black: sodium citrate; blood sedimentation
2.Light blue: sodium citrate; blood coagulation test (e.g. PT, APTT)
3.Dark blue: sodium heparin or EDTA-Na2; blood trace elements
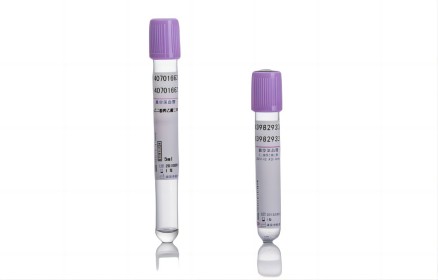
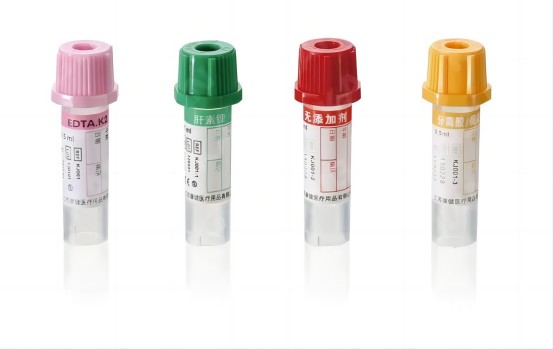
4.Purple: EDTA-K2; blood routine (blood cell analysis)
5. Green: lithium heparin; most biochemistry, blood ammonia
6. Gray: blood glucose degradation inhibitor and EDTA-Na2; blood glucose
7. Brown: heparin sodium or EDTA-K2; blood lead
8. Light yellow ACD tube: glucose, anticoagulant; blood bank test
9. Light yellow SPS tube: SPS solution, sodium chloride solution; blood culture, microbial culture
Tail-tip blood collection
After anesthetizing the mouse, wipe the tail with warm water (but not too hot) to cause slight vasodilation. Using a sterile scalpel, razor blade, or sharp scissors, quickly amputate the tip of the mouse's tail by 0.5-1 cm. If multiple blood collections are required, only 2-3 mm should be amputated each time thereafter.
It can be massaged from the tail towards the tip to increase blood flow (however, this reduces the quality of the blood sample and increases the risk of hemolysis). Blood can also be collected with a capillary collection tube or directly into a collection tube. At the end of the blood collection, pressure is applied to the wound or a hemostatic agent (e.g., silver nitrate, 6% liquid fire cotton glue) is used to stop the bleeding. The volume of blood collected can be approximately 0.1 ml per collection.
Orbital plexus blood collection
Advantages: The method of blood collection from the retro-orbital plexus is simple and easy to master. The blood flow is faster and the amount of blood collected is more, about 0.5mL of blood can be collected in a short time. Smaller wound, faster healing. High success rate and low mortality rate.
Disadvantages: It cannot avoid the mixing of tissue fluid, and should be used with caution for studies with high requirements for blood samples.
After the mouse is gas anesthetized, the thumb and index finger of the left hand are pressed against the sides of the neck of the mouse to obstruct venous reflux and cause full protrusion of the eye, suggesting congestion of the retro-orbital venous plexus. The mouse can also be placed in the lateral recumbent position with the thumb and index finger placed on the top of the mouse's head and jaw, respectively, pulling the skin backward and downward. It is important to avoid applying pressure to the trachea when grasping, as this may interfere with the mouse‘s breathing.
Place the capillary collection tube (0.5*100mm size capillary tube is recommended, folded into small sections of approximately 3-4cm each before use) at the medial corner of the eye and insert it at 30-45 degrees to the plane of the nose along the medial canthus into the inner corner of the eye, slide it into the back of the eye and gently pierce it toward the base of the eye.
When resistance is felt, gently rotate the blood collection tube while applying pressure to cut the venous plexus, blood will flow into the blood collection tube through capillary action. It should not be stabbed too deep, usually 2-3mm is enough.
After blood collection, immediately release the finger pressure on the mouse to reset the eye, while pulling out the blood collection device. A dry cotton ball can be pressed against the orbit to ensure hemostasis. The general volume of blood collected from the orbital plexus can reach 0.2-0.3 ml.
Submaxillary vein blood collection
To bind the mouse, the mouse can be placed on its side so that the head is as fixed as possible. Find the approximate location of the submandibular vein along the corner of the mouse's mouth at the rubber of the line with the outer corner of the eye, and you will find a small hairless spot, somewhat resembling a dimple, basically located at the distal corner of the mouth slightly below the jaw line.
The needle is kept perpendicular to the skin surface and pierced into the skin. The depth does not exceed the bevel of the needle (about 3 mm). When the needle is withdrawn, blood flows out. To facilitate blood collection, the head of the mouse can be kept below the height of the heart. At the end of blood collection, pressure is applied to stop the bleeding. The usual blood collection volume is 0.2-0.5 ml.
Saphenous vein blood collection (total 5%)
The mouse is placed in a fixed tube or stand, but the hind legs are kept free to move and the hock is shaved. To make the saphenous vein between the knee and ankle more visible, a tourniquet can be applied above the knee on the hind leg. The saphenous vein can be found on the surface of the skin near the caudal side.
The needle is placed perpendicular to the skin surface to pierce the blood vessels. Do not enter the needle too deeply to avoid puncturing the muscle or touching the bone. Blood will slowly flow out from the entry point, collected with a capillary collection tube, and the tourniquet is loosened. After blood collection, apply pressure to the wound or a hemostatic agent (e.g., silver nitrate) to stop the bleeding and return the mouse to the cage.
Sublingual venous blood collection
The mouse was anesthetized and placed supine on the experimental table and fixed. The mouse's tongue was pulled out with curved ophthalmic forceps, and the sublingual vein was clearly visible.
Hold the blood collection needle at an angle of 10° to the tongue and insert it into the sublingual vein, and slowly draw the blood when it is returned until the required amount of blood is collected.
Jugular vein blood collection
The blood collection volume (0.2 ml to nearly whole blood) and blood collection frequency (1 to 8 times/day) for this method can vary depending on the purpose of the analysis. It is suitable for studies that require continuous small blood collection, such as few personnel, many animals, tight experimental time, pharmacokinetics, etc. However, skilled technique is required to be able to handle it. In a certain period of time, if the amount of blood collection and the number of blood collection increases, the animal will cause a certain stress reaction or injury to the blood collection site.
The skin of the animal was disinfected in the anterior thoracic region, and the skin was first pierced horizontally with a syringe needle at the level of the fourth rib in the anterior midline.
Then insert the needle subcutaneously to the position of the jugular vein. When the needle reaches the position of the jugular vein, gently guide the inner barrel of the syringe to make it negative pressure, and then make the syringe and the chest surface at an angle of 30° to 40° to pierce the jugular vein. The syringe should be in the same direction as the jugular vein.
During the piercing process, the speed should be slow, and the piercing depth should be about 5 mm. During the tentative slow piercing or pulling out, if blood automatically flows into the inner barrel of the syringe, it means that the needle tip is already in the jugular vein, and fixed mouse at this time. Do not move the syringe needle.
The lancet can also be placed on the sternum of the animal for easy operation. Carefully draw the inner barrel of the syringe. When the blood is sufficient, pull out the lancet and press with a dry cotton ball to stop the bleeding.
Tail vein blood collection
One person can use a mini flashlight or LED night light etc. close to the tail vein, under the light, the tail vein will be shown very clearly to improve the success rate.
For immobilizer (self-designed) mouse, straighten the tail and wipe the tail with an alcohol cotton ball or warm the tail with hot water or a hot towel (hot water-soaked mouse tail) to dilate the tail vein.
Secure the tail with the index finger, middle finger, ring finger, and thumb of the left hand.
Hold the 1 ml syringe (29 G needle is preferred) in front of the 0.1 ml, and slowly insert the needle (about 1/3 of the distal end of the tail) with the little finger of the right hand at an angle of 15° to the thumb of the left hand, which is holding the tail of the mouse. Increase the internal pressure appropriately to see if there is blood return, if there is blood return then slowly extract the required amount of blood, and cotton swab pressure to stop bleeding.
Submaxillary vein blood collection
The mouse is anesthetized and placed flat on the experimental table, with the middle and index fingers holding the tail of the mouse in place.
The lateral caudal vein or the median caudal artery of the mouse was gently cut with a razor blade. After the blood flows out, aspirate the blood with a pipette. After the blood was taken, the cotton swab was pressed to stop the bleeding.
Abdominal aortic blood collection
Advantages: the blood collection method takes a large amount of blood, is not easy to hemolysis, blood quality is better, suitable for multi-project testing, does not damage organs, and is conducive to pathological histological examination.
Disadvantages: the operation is more complicated, and care should be taken to master the appropriate depth of anesthesia to prevent cardiac arrest, and also to prevent the rat from agitation. The bleeding rate caused by this method is fast and easy to cause hemorrhagic cardiac arrest, so it is necessary to prevent bleeding during blood collection. And this method of blood collection process such as multiple blood collection should not pull out the needle.
After the rat is injected intraperitoneally with anesthetic until the body becomes soft all over, the rat is fixed supine on the operating table and a thick test tube can be placed on the back to fully expose the abdominal aorta.
After routine disinfection, the abdominal cavity is cut along the midline of the abdomen with surgical scissors, and the fat around the vessels is gently peeled away with small forceps, and then the excess fat covering the vessels is wiped away with cotton balls until the vessels are clearly visible (using cotton balls minimizes bleeding from small vessel ruptures, which can affect the line of sight during the next needle insertion).
Find the abdominal aorta (pink) above the spine, next to the vena cava vessels (thicker than the abdominal aorta, black). After finding it, the surgeon first fixes the vessels, avoiding as much as possible their displacement, fixes the fat and other organs on both sides of the vessels with the thumb and index finger of the left hand, and presses the ring finger on the upper end of the needle entry point of the vessels to lower the blood pressure, which can avoid spilling blood.
The puncture needle is held in the right hand, the tip of the needle is beveled downward, the angle of entry is about (less than) 30 degrees or so, the needle is pierced in the direction of the cardiac end, and the depth is about 5 mm. After entering the needle, the needle can be clamped with a hemostatic clip, which can avoid insufficient anesthesia to struggle and cause the vessel to be punctured by the needle.
After taking the blood, use a cotton ball to lightly press the eye of the needle, quickly pull out the needle, you can repeatedly collect multiple tubes of blood samples for different items of testing (general weight 200~300g rats can collect 8~10mL of blood).
Heart blood collection (do not use if not necessary)
Advantages: fast blood collection, blood is not easy to coagulate, the heart area is large, the accuracy of the needle is high, a needle can see blood, and the volume of blood collection can meet the needs of a large number of tests.
Disadvantages: the success rate of blood collection is small, the mortality rate is high, the heart damage is large, it is difficult to heal quickly, it is not conducive to short-term continuous blood collection, and it is impossible to determine whether it is venous blood or arterial blood.
There are generally 3 positions for cardiac blood collection: 1. The trunk of the mouse is held so that the body is perpendicular to the ground. The body is held upright to prevent deflection of the heart or distortion of the chest. Use a 1 ml syringe and a 22 g needle. Insert the needle 5 mm down from the center of the chest to a depth of 5-10 mm, keeping the syringe 25-30 degrees from the chest; 2. Make the mouse lie on its back and fix it, cut the hair in the anterior thoracic area, disinfect the skin, touch the heart beat with the index finger of the left hand between the 3rd and 4th ribs on the left side, hold the syringe with a 4-5 gauge needle in the right hand, and choose the strongest heart beat to puncture; 3. Make the mouse lie on its side and insert the needle perpendicular to the chest wall .
If blood does not enter the syringe immediately, the syringe can be gently evacuated to create a vacuum area.
When blood appears in the syringe, hold the syringe stationary and gently pull the piston wand to obtain more blood. Typically 0.8-1.0 ml of blood can be collected.
Removal of eyeball for blood collection
The mouse's neck scalp is grasped with the left thumb, index finger and middle finger, the pinky and ring finger fix the tail, and the skin of the eye to be removed is gently pressed so that the eye is filled with blood and protrudes.
The mouse's whiskers are cut off with ophthalmic scissors to prevent blood from flowing down the whiskers and causing hemolysis.
The eye is clamped with ophthalmic curved forceps and quickly removed and the blood is allowed to flow from the orbit into a 0.5 ml EP tube. After the mouse is finished with blood extraction, the neck is broken and the mouse is executed.
Blood collection by decapitation
Pinch the skin of the mouse neck with the left thumb and index finger with a tighter back and make a mouse head-down position. With the right hand, cut the mouse neck vigorously with scissors, about 1/2-4/5 of the neck, and let the blood drip into the container.
Difference between whole blood, plasma and serum
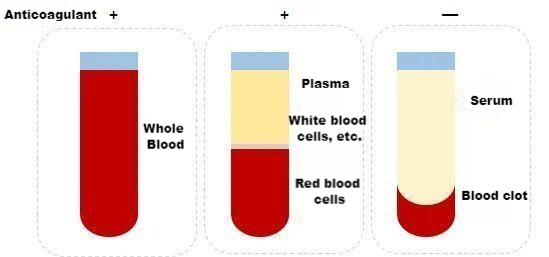
Whole blood includes all components of blood cells and plasma. When whole blood is collected, the collection tube must contain an anticoagulant. Commonly used anticoagulants are: heparin, sodium citrate and EDTA. The choice is made according to the needs of different studies.
Plasma is a liquid free of cellular components obtained from whole blood after anticoagulation and precipitation by centrifugation. It contains fibrinogen, clotting factors, etc.
Serum is the liquid released from the condensation of blood clots without anticoagulation in whole blood. There are no fibrinogen and coagulation factors in it.
The general method for separating plasma and serum is to centrifuge at 2200-2500 rpm for at least 15 minutes.
A normal serum or plasma sample is clear yellow, while if it is reddish, there is red blood cell rupture and hemolysis occurs. The following should be noted to avoid hemolysis:
1. When collecting blood, it is necessary to avoid mouse hair and oil contaminating the blood to cause hemolysis. The containers and syringes used must be clean and dry, and there should be no water or organic solvents.
2. Do not draw blood too fast, as bubbles will be generated if the speed is too fast. If using a tourniquet, do not stick the tourniquet for too long.
3. When the blood drawn is put into the test tube, the needle should be pulled out before bleeding, and the speed should not be too fast.
4. When collecting serum-separated whole blood, try to make the blood directly enter the bottom of the small tube to avoid hemolysis of the blood on the tube wall or tube cover during the centrifugation process.
Can samples with hemolysis still be tested by ELISA?
Hemolysis may occur due to incorrect operation of blood sample collection, strong shock and repeated freezing and thawing.
In the ELISA test, if the sample hemolysis is slight (light red), the ELISA test can still be performed. It is recommended to increase the number of plate washings appropriately to reduce the effect of excessive background; if the hemolysis is severe (dark red), it is recommended to resample.
Hemolysis of the sample may cause an increase in the OD value of the ELISA test and a false positive result.
The reason may be that the free hemoglobin in the sample is non-specifically adsorbed on the ELISA plate, and the heme in hemoglobin has a peroxidase-like activity, and its function is similar to horseradish peroxidase, and then catalyzes the reaction of the substrate to increase the OD value of the sample and cause false positives.

 RETURN