


A brief introduction to the principle and detailed experimental steps of co-immunoprecipitation (Co-IP)
 source:Technical division
 date:2022-06-08
 views:720
1.Principle
Co-immunoprecipitation (Co-Immunoprecipitation) is a classic method for studying protein interactions based on the specific interaction between antibodies and antigens. It is an effective method to determine the physiological interaction of two proteins in intact cells.
The rationale is that when cells are lysed under native conditions, many of the protein-protein interactions that exist in intact cells are preserved. If an antibody to protein X is used to immunoprecipitate X, then protein Y that binds to X in vivo will also precipitate.
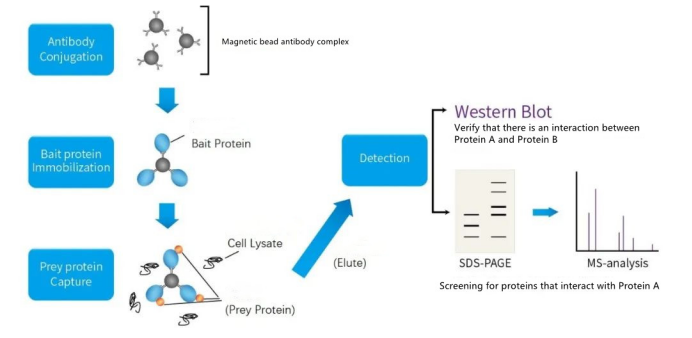
At present, the purified prorein A is used to bind and solidify on the beads of argarose in advance, and after reacting with the solution containing the antigen and the antibody, the prorein A on the beads can adsorb the antigen to achieve the purpose of purification. This method is commonly used to determine whether two target proteins bind in vivo; it can also be used to identify novel partners of action for a particular protein.
Its advantages are:
(1) The interacting proteins are post-translationally modified and are in their native state;
(2) The interaction of proteins is carried out in a natural state, which can avoid human influence;
(3) The interacting protein complexes in the natural state can be isolated.
The disadvantages are:
(1) Low affinity and transient protein-protein interactions may not be detected;
(2) The binding of the two proteins may not be a direct binding, but a third party may act as a bridge in the middle;
(3) It is necessary to predict what the target protein is before the experiment in order to select the final antibody to be detected. Therefore, if the prediction is incorrect, the experiment will not get results, and the method itself is risky.
2. Preparation
Pre-cooled PBS, RIPA Buffer, cell scraper (wrapped with plastic wrap and buried under ice), centrifuge
1. Wash the cells twice with pre-cooled PBS and blot dry the PBS for the last time;
- Add pre-cooled RIPA Buffer (1ml/107 cells, 10cm culture dish or 150cm2 culture flask, 0.5ml/5×106 cells, 6cm culture dish, 75cm2 culture flask)
3. Scrape the cells from the culture dish or flask with a pre-cooled cell scraper, transfer the suspension to a 1.5EP tube, and shake it slowly for 15 minutes at 4°C (the EP tube is placed on ice and placed on a horizontal shaker).
4. Centrifuge at 14,000g for 15 minutes at 4°C, and immediately transfer the supernatant to a new centrifuge tube
5. Prepare Protein A agarose, wash the beads twice with PBS, and then prepare them to 50% concentration with PBS. It is recommended to cut off the pipette tip and the pointed part to avoid damaging the agarose beads during operations involving agarose beads.
6. Add 100 μl Protein A agarose beads (50%) to every 1 ml of total protein, and shake at 4°C for 10 minutes (the EP tube is placed on ice and placed on a horizontal shaker) to remove non-specific impurities and reduce background.
7. Centrifuge at 14,000g for 15min at 4°C, transfer the supernatant to a new centrifuge tube, and remove the Protein A beads
8. (Bradford method) Make a protein standard curve and determine the protein concentration. Before the measurement, dilute the total protein by at least 1:10 times to reduce the influence of detergents in the cell lysate (quantitative, after aliquoting, it can be at -20 ℃ for one month)
9. Dilute the total protein to about 1 μg/μl with PBS to reduce the detergent concentration in the lysate, if the bait protein is low in the cells, the total protein concentration should be slightly higher (eg 10 μg/μl)
10. Add a certain volume of rabbit antibody to 500μl of total protein. The dilution ratio of the antibody varies depending on the amount of bait protein in different cell lines.
11. Slowly shake the antigen-antibody mixture at 4°C overnight or at room temperature for 2 hours. For kinase or phosphatase activity analysis, it is recommended to incubate at room temperature for 2 hours.
12. Add 100 μl Protein A agarose beads to capture the antigen-antibody complex, shake the antigen-antibody mixture slowly at 4°C overnight or at room temperature for 1 h. If the antibody used is mouse or chicken antibody, it is recommended to add 2 μl of "transition antibody" (rabbit anti-mouse). IgG, rabbit anti-chicken IgG)
13. Centrifuge briefly at 14000rpm for 5s, collect the agarose beads-antigen-antibody complexes, remove the supernatant, wash 3 times with pre-cooled RIPA buffer, 800μl/time, RIPA buffer sometimes destroys the inside of the agarose beads-antigen-antibody complexes A combination of PBS can be used
14. Suspend the agarose beads-antigen-antibody complex with 60 μl of 2× loading buffer and mix gently. The amount of buffer depends on the amount of sample loaded (60 μl is enough for three lanes)
15. Boil the sample for 5 minutes, use free antigens, antibodies, beads, centrifuge, electrophoresis the supernatant, and collect the remaining agarose beads. The supernatant can also be temporarily frozen at -20°C for later electrophoresis. Before electrophoresis, it should be boiled again for 5 minutes. transsexual.
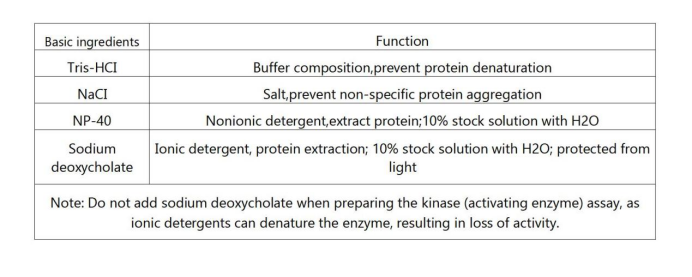
RIPA Buffer preparation:
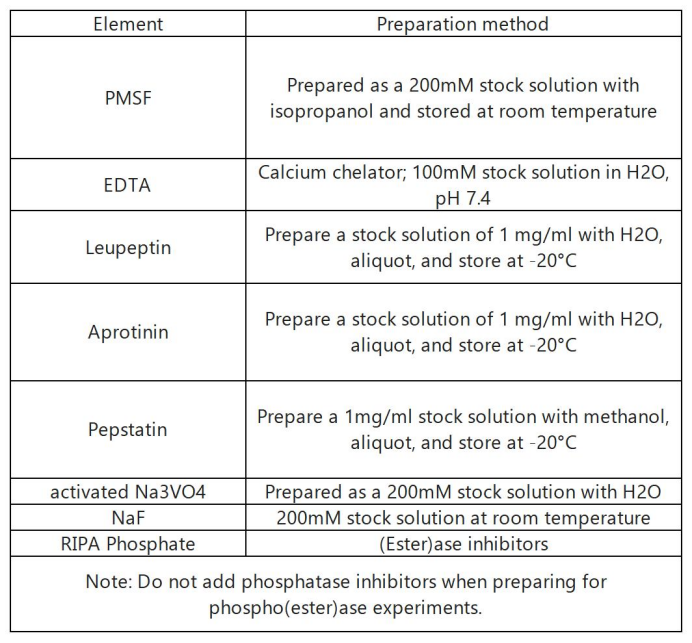
RIPA protease inhibitor:
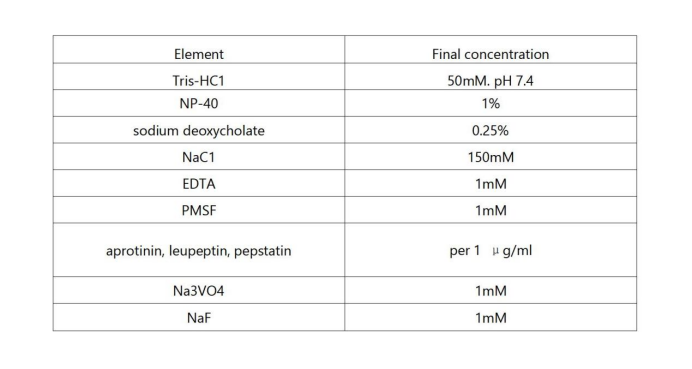
Working fluid preparation:
To make 100ml of modified RIPA buffer:
1. Weigh 790mg of Tris-Base, add it to 75ml of deionized water, add 900mg of NaCl, stir until all dissolved, adjust the pH to 7.4 with HCl
2. Add 10 ml of 10% NP-40
3. Add 2.5 ml of 10% sodium deoxycholate and stir until the solution is clear
4. Add 1 ml of 100mM EDTA, dilute to 100ml with a graduated cylinder, and store at 2-8°C
5. In theory, protease and phosphatase inhibitors should be added at the same time on the day of use (aprotinin, leupeptin, pepstatin 100 μl each; PMSF, Na3VO4, NaF 500 μl each), but PMSF in aqueous solution It is very unstable in medium and will degrade by half in 30 minutes, so PMSF should be added immediately before use, and other inhibitor components can be stable in aqueous solution for 5 days.
Final concentrations of RIPA protease inhibitor components in the working solution:
- The experimental process is as follows
(1) The cells can be harvested 24-48 hours after transfection, add an appropriate amount of cell lysis buffer (containing protease inhibitors), lyse on ice for 30 min, and centrifuge the cell lysate at 4°C for 30 min at the maximum speed, and then take the supernatant;
(2) Take a small amount of lysate for Western blot analysis, add 1 μg of the corresponding antibody to the remaining lysate and add it to the cell lysate, and incubate at 4°C with slow shaking overnight;
(3) Take 10 μl protein A agarose beads, wash three times with an appropriate amount of lysis buffer, and centrifuge at 3,000 rpm for 3 min each time;
(4) Add 10 μl of pretreated protein A agarose beads to the cell lysate incubated overnight with the antibody, and incubate at 4°C with slow shaking for 2-4 hours to couple the antibody to the protein A agarose beads;
(5) After the immunoprecipitation reaction, centrifuge at 3,000 rpm for 3 min at 4°C, and centrifuge the agarose beads to the bottom of the tube; carefully remove the supernatant, and wash the agarose beads 3-4 times with 1 ml of lysis buffer; Finally, add 15 μl of 2×SDS loading buffer and boil in boiling water for 5 minutes;
(6) SDS-PAGE, Western blotting or mass spectrometry analysis. Determination of bound proteins by co-immunoprecipitation
1. Appropriate cells were washed in 30 10 cm plates with phosphate buffered saline. Scrape the cells from each plate into 1 ml of ice-cold EBC lysis buffer.
2. Transfer each milliliter of cell suspension to a microcentrifuge tube and centrifuge in a microcentrifuge at 4°C for 15 min at maximum speed.
3. Collect the supernatant (about 30 ml) and add 30 μg of the appropriate antibody and shake the immunoprecipitate for 1 h at 4 °C.
4. Add 0.9 ml of protein A-Sepharose suspension and shake the immunoprecipitate for 30 min at 4°C.
5. The protein A-Sepharose mixture was washed with NETN containing 900 mmol/L NaCl, and the washing was repeated 5 times. Finally, wash once with NETN.
6. Aspirate the liquid portion of the mixture. Add 800 μl of 1×SDS gel loading buffer to the beads and boil for 4 min.
7. Samples were added to large-pore discontinuous SDS-PAGE gradient gels and electrophoresed overnight at a constant current of 10 mA.
8. Protein bands were visualized by Coomassie blue staining.
9. The target band was cut from the gel, placed in a microcentrifuge tube, and washed twice with 1 ml of 50% acetonitrile for 3 min each.
10. The proteins in the gel were trypsinized and the peptides were electroeluted.
11. Peptides were separated by narrow-bore high performance liquid chromatography. The collected peptides were sequenced by automated Edman degradation on an ABI 477A or 494A machine.
4.Pay attention to the problem
(1) Mild lysis conditions are used for cell lysis, which cannot destroy all protein-protein interactions in cells, and non-ionic denaturants (NP40 or Triton X-100) are mostly used. Lysis conditions are different for each type of cell and are determined empirically. High concentrations of denaturant (0.2% SDS) cannot be used, and various enzyme inhibitors, such as commercial cocktailers, should be added to the cell lysate.
(2) Using a specific antibody, several antibodies can be used together
(3) Use a control antibody:
Monoclonal antibody: normal mouse IgG or another type of mAb
Rabbit polyclonal antibody: normal rabbit IgG
To ensure the authenticity of the experimental results in co-immunoprecipitation experiments, the following points should be noted:
(1) Ensure that the co-precipitated protein is precipitated by the added antibody, not an exogenous non-specific protein, and the use of monoclonal antibodies helps to avoid contamination;
(2) To ensure the specificity of the antibody, that is, the addition of the antibody to the cell lysate that does not express the antigen will not cause co-precipitation;
(3) To confirm that the interaction between proteins occurs in the cell, not due to the lysis of the cell, which requires the localization of the protein to determine.
The principle of CoIP, like WB, is the immune reaction of antibody-antigen binding. As long as you know WB, you can easily understand the principles of IP and CoIP. Simply put, if protein B is bound to protein C, then when an antibody is used to bind protein B, protein C can be pulled down.
The structure of the antibody is a Y-shaped, with Fab at both ends for recognizing the antigen, and the tail is the Fc region, which can bind Protein A or G. Since the advent of magnetic beads, the operation of CoIP has become more simple. It only needs to use the magnetic beads coated with Protein A or G to bind the antibody first, then use the antibody-magnetic-bead complex to bind protein B, and then use PAGE gel. Separation, detection with WB is OK.
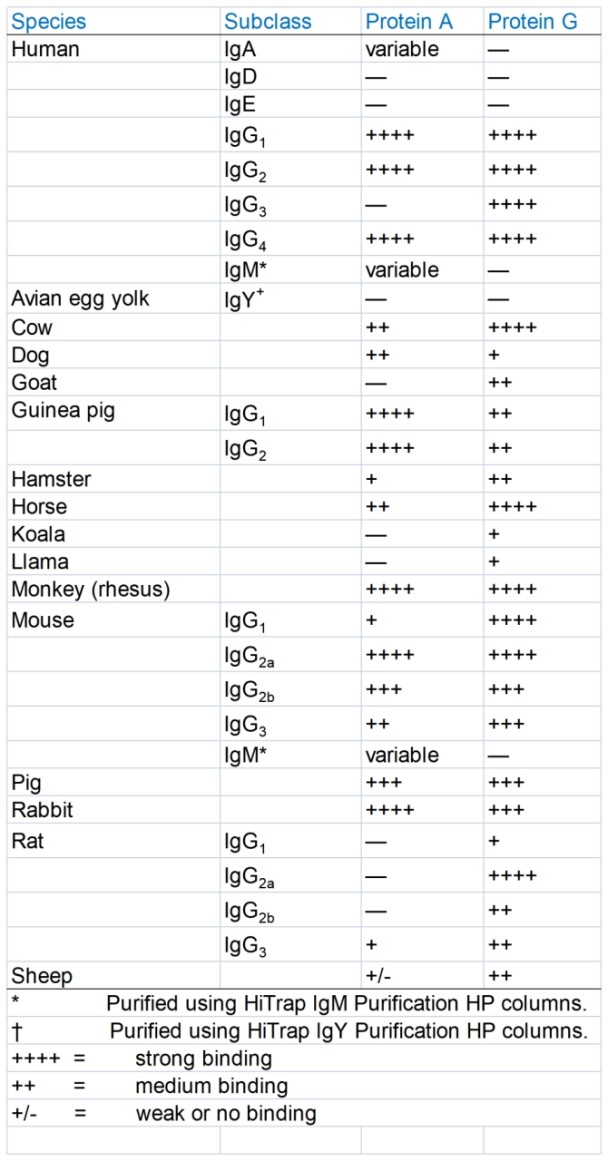
Protein A and G affinity comparison
The difference in the binding ability of protein A and protein G to antibodies of different species and subtypes is shown in the table below. Protein A has a higher affinity for rabbit-derived antibodies, and protein G has a higher affinity for some mammalian antibodies such as mice.
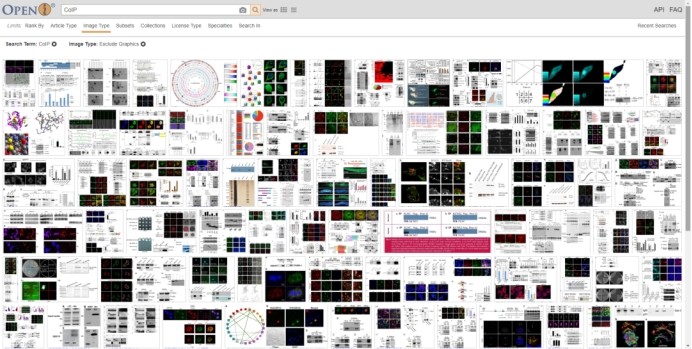
Regarding how to set up the CoIP control group, you can directly search for the pictures in the "CoIP" paper on the Openi website, and see what the predecessors did to know how to set up the control group.
Next, just follow the established process of the experiment. In the end, we use the results of several articles as examples: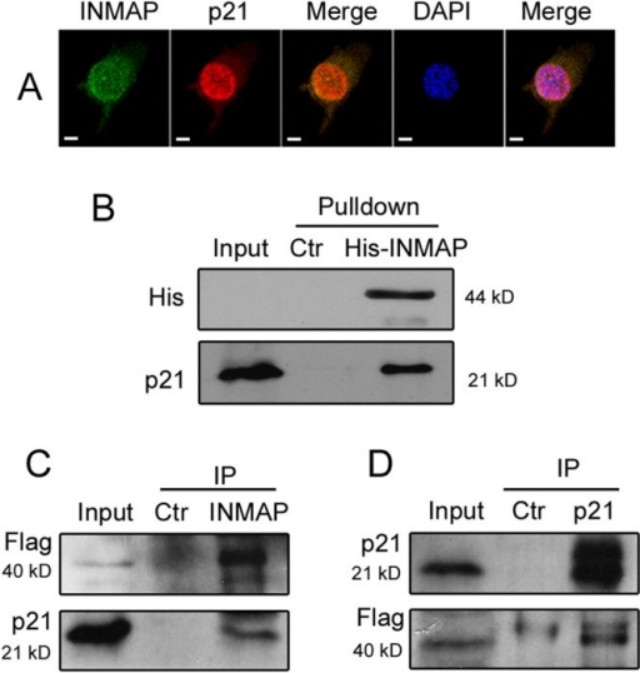
With such a result, the grade of the article will went up : )

 RETURN